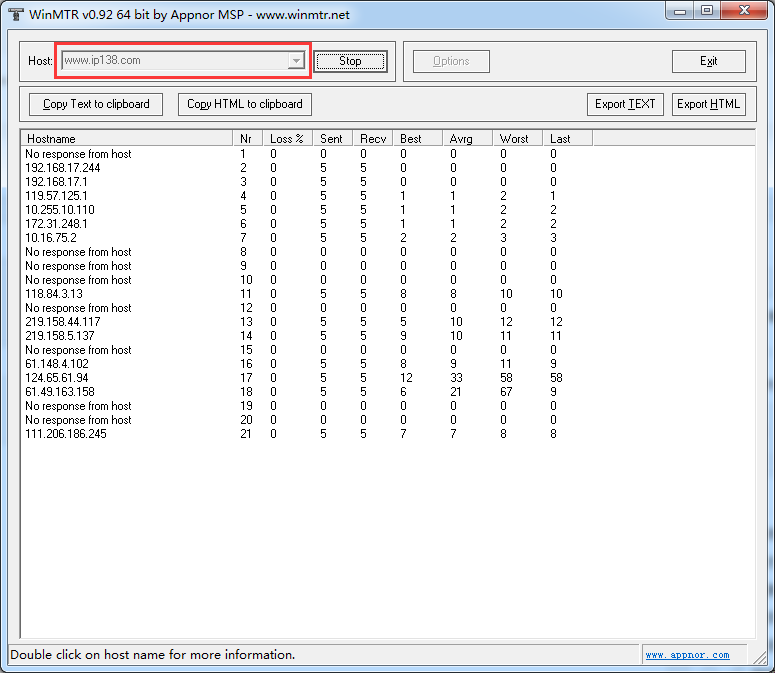
windows 环境下 ping 加时间戳 记日志

在c盘下面新建文件 ping.vbs

在 ping.vbs中输入代码如下:

Dim args, flag, unsuccOut
args=""
otherout=""
flag=0

If WScript.Arguments.count = 0 Then
WScript.Echo "Usage: cscript tping.vbs [-t] [-a] [-n count] [-l size] [-f] [-i TTL] [-v TOS]"
WScript.Echo "                         [-s count] [[-j host-list] | [-k host-list]]"
WScript.Echo "                         [-r count] [-w timeout] destination-list"
wscript.quit
End if

For i=0 to WScript.Arguments.count - 1
args=args & " " & WScript.Arguments(i)
Next

Set shell = WScript.CreateObject("WScript.Shell")
Set re=New RegExp
re.Pattern="^Reply|^Request|^来自|^请求"

Set myping=shell.Exec("ping" & args)

while Not myping.StdOut.AtEndOfStream
   strLine=myping.StdOut.ReadLine()
'WScript.Echo  "原数据" & chr(9) & strLine
   r=re.Test(strLine)
   If r Then
WScript.Echo date & " "& time & chr(9) & strLine
flag=1
   Else
unsuccOut=unsuccOut & strLine
   End if
Wend

if flag = 0 then
WScript.Echo unsuccOut
end if

在命令行输入

cd /


cscript ping.vbs www.baidu.com -t -l 1 >>c:\logping.txt

附:Linux下ping不通邮件报警http://www.laihp.top/zqb/?p=512
推荐一款流量监控软件,单纯的流量监控功能

软件下载:lljk360

360流量监控是从360中提取的流量监控软件,已去掉360图标,功能一样,同样支持WINDOWS7,减少了内存的占用.

下载后运行先解压,后运行文件【流量监控.bat】即可。

如出现驱动无法加载,请运行包内的uninst.exe卸载程序,重启遍再试试(请先确认没有安装360安全卫士,如果安装了先卸载掉)。

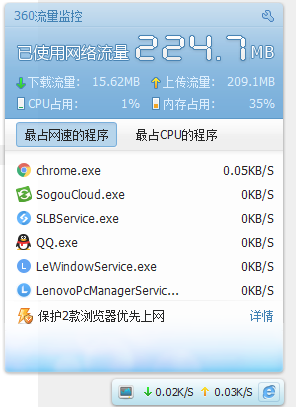
运行如下图所示:(可以实时查看各个程序网络速率)


TrafficMonitor

下载:http://dwz.date/cZBH

TrafficMonitor的功能非常全面,能够显示多个网卡的上传、下载的实时网速,支持流量统计,还有处理器占用,内存占用信息。在TrafficMonitor的主界面上单击右键,我们就可以看到具体的设置功能信息。比如我们去掉勾选“显示任务栏窗口”,则右下方任务栏的信息显示栏就会消失,只保留主界面显示信息,

具体介绍见以下链接:https://mp.weixin.qq.com/s/1f8p3hcHzkX-nsxh8rpXyA


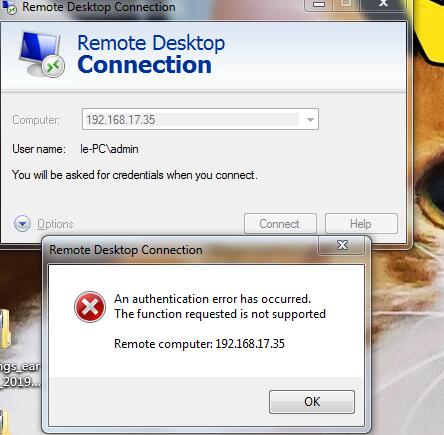
远程桌面是报错an authentication error has occurred

报错如下图所示:

An authentication error has occurred.
The function requested is not supported
Remote Computer: <Computer Name>

网上看了一些解决方案:

方案 结果
该方案参考链接:https://blog.csdn.net/qq_32688731/article/details/80277530

1. 开始 >  search  >  gpedit.msc

2. Computer Configuration -> Administrative Templates -> System -> Credentials Delegation -> Encryption Oracle Remediation

3. Encryption Oracle Remediation ->  choose Enable  -> change protection level->Vulnerable -> Apply

我的Windows server2016没有该Oracle选项,所以没用该方案
方案参考链接:https://www.experts-exchange.com/articles/32140/Remote-Desktop-Authentication-Error-Has-Occurred-The-function-requested-is-not-supported-CredSSP.html

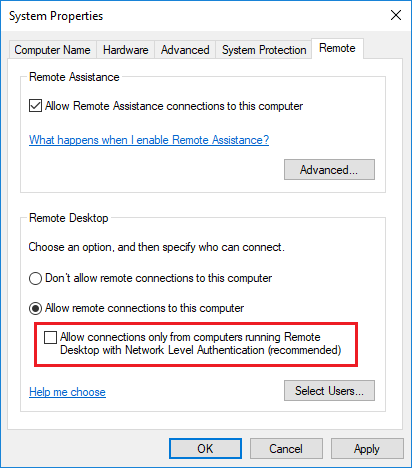
只需将主机上的远程桌面设置调整到较低的安全级别即可。从文件资源管理器中,选择计算机,右键单击并选择属性,然后单击更改设置,然后转到远程选项卡。

取消选中“仅允许从运行带有网络级别身份验证的远程桌面的计算机进行连接(推荐)”选项:

该方案解决了上述问题


Linux创建秘钥文件登录

生成 .pem 步骤如下:
1、

  • 在服务器端直接生成密码密钥对
    $ ssh-keygen -t rsa -b 2048 -v
    执行上述命令首先会让你输入生成密钥的文件名:我这里输入的 323,之后一路回车。
    在执行命令的当前目录下会生成一个323.pub、323两个文件。
  • 或者在Xshell里创建秘钥文件。(未测试完)

2、

把生成的 323.pub 通过本地命令推送到服务器端,使服务器自动添加认证这个证书
$ ssh-copy-id -i 323.pub zhangqing@192.168.3.23

zhangqing@zqubuntu:/data/ttt$ ssh-copy-id -i 323.pub zhangqing@192.168.3.23
/usr/bin/ssh-copy-id: INFO: Source of key(s) to be installed: "323.pub"
/usr/bin/ssh-copy-id: INFO: attempting to log in with the new key(s), to filter out any that are already installed
/usr/bin/ssh-copy-id: INFO: 1 key(s) remain to be installed -- if you are prompted now it is to install the new keys
zhangqing@192.168.3.23's password: 

Number of key(s) added: 1

Now try logging into the machine, with:   "ssh 'zhangqing@192.168.3.23'"
and check to make sure that only the key(s) you wanted were added.


可能会报错:

报错 解决
root@zqubuntu:/data# ssh-copy-id -i /data/ttt/323.pub zhangqing@192.168.3.23

/usr/bin/ssh-copy-id: ERROR: failed to open ID file '/data/ttt/323': No such file
	(to install the contents of '/data/ttt/323.pub' anyway, look at the -f option)
这个问题的解决办法很简单,使用touch命令在公钥323.pub所在目录下创建一个空文件“323”即可。

3、

在服务器上测试连接:ssh -i 323.pub zhangqing@192.168.3.23

报错 解决
Permissions 0644 for ‘323.pub’ are too open.
仔细阅读了一下ssh文档和这句提示,大概的意思时ssh的私有密钥的权限开放尺度太大了,可以供人随意>欣赏了,ssh自身的策略关闭了ssh。
解决方案:将权限由0644降低为0600
root@zqubuntu:/data/ttt# chmod 600 323
root@zqubuntu:/data/ttt# ssh -i 323.pub zhangqing@192.168.3.23
Load key "323.pub": invalid format
zhangqing@192.168.3.23: Permission denied (publickey).
前期Xshell建立的秘钥报的错误。后来直接在服务器上生成秘钥,不报错了。


4、

复制323文件到客户端,然后可以直接用public key方式连接。

.pem后缀加不加都行。我默认没有这个后缀也没有加。

Ubuntu安装samba文件共享

apt-get install samba
root@zqtest1:/etc/samba# vim smb.conf
最后一行添加:
[Share]
comment = Home Public Folder
path = /var/www/aa
public = yes
writable = yes
valid users = zhangqing


adduser zhangqing
smbpasswd -a zhangqing

重启:

service samba restart(Ubuntu)

查看所有用户:cut -d : -f 1 /etc/passwd
service smb restart
(Linux version 3.10.0-229.14.1.el7.x86_64 (builder@kbuilder.dev.centos.org) (gcc version 4.8.3 20140911 (Red Hat 4.8.3-9) (GCC) ) #1 SMP Tue Sep 15 15:05:51 UTC 2015)

[share] # 该共享的共享名
        comment = smb share test # 该共享的备注
        path = /home/share # 共享路径
        allow hosts = host(subnet) # 设置该Samba服务器允许的工作组或者域
        deny hosts = host(subnet) # 设置该Samba服务器拒绝的工作组或者域
        available = yes|no # 设置该共享目录是否可用
        browseable = yes|no # 设置该共享目录是否可显示
        writable = yes|no # 指定了这个目录缺省是否可写,也可以用readonly = no来设置可写
        public = yes|no # 指明该共享资源是否能给游客帐号访问,guest ok = yes其实和public = yes是一样的
        user = user, @group # user设置所有可能使用该共享资源的用户,也可以用@group代表group这个组的所有成员,不同的项目之间用空格或者逗号隔开
        valid users = user, @group # 指定能够使用该共享资源的用户和组
        invalid users = user, @group # 指定不能够使用该共享资源的用户和组
        read list = user, @group # 指定只能读取该共享资源的用户和组
        write list = user, @group # 指定能读取和写该共享资源的用户和组
        admin list = user, @group # 指定能管理该共享资源(包括读写和权限赋予等)的用户和组
        hide dot files = yes|no # 指明是否像UNIX那样隐藏以“.”号开头的文件
        create mode = 0755 # 指明新建立的文件的属性,一般是0755
        directory mode = 0755 # 指明新建立的目录的属性,一般是0755
        sync always = yes|no # 指明对该共享资源进行写操作后是否进行同步操作
        short preserve case = yes|no # 指明是否区分文件名大小写
        preserve case = yes|no # 指明是否保持大小写
        case sensitive = yes|no # 指明是否对大小写敏感,一般选no,不然可能引起错误
        mangle case = yes|no # 指明混合大小写
        default case = upper|lower # 指明缺省的文件名是全部大写还是小写
        force user = testuser # 强制把建立文件的属主是谁。如果我有一个目录,让guest可以写,那么guest就可以删除,如果我用force user= testuser强制建立文件的属主是testuser,同时限制create mask = 0755,这样guest就不能删除了
        wide links = yes|no # 指明是否允许共享外符号连接,比如共享资源里面有个连接指向非共享资源里面的文件或者目录,如果设置wide links = no将使该连接不可用
        max connections = 100 # 设定最大同时连接数
        delete readonly = yes|no # 指明能否删除共享资源里面已经被定义为只读的文件

查看和修改Linux的时区及NTP时间校对服务的搭建

一、查看和修改Linux的时区

1. 查看当前时区

命令 : “date -R”

2. 修改设置Linux服务器时区

方法 A

命令 : “tzselect”

方法 B 仅限于RedHat Linux 和 CentOS

命令 : “timeconfig”

方法 C 适用于Debian

命令 : “dpkg-reconfigure tzdata”

3. 复制相应的时区文件,替换系统时区文件;或者创建链接文件

cp /usr/share/zoneinfo/$主时区/$次时区 /etc/localtime

例如:在设置中国时区使用亚洲/上海(+8)

cp /usr/share/zoneinfo/Asia/Shanghai /etc/localtime

4.注意

GMT(Greenwich Mean Time,格林威治标准时间):
是指位于英国伦敦郊区的皇家格林尼治天文台的标准时间,因为本初子午线被定义在通过那里的经线。
UTC(Universal Time/Temps
Cordonné 世界标准时间)
CST(Central Standard Time 國家標準時間,一說中原標準時間); 中国标准时间(China
Standard Time)
GMT + 8 = UTC + 8 = CST


二、NTP服务的搭建及客户端校准

apt-get install ntp
可选择操作编辑:vim /etc/ntp.conf,可添加以下NTPserver,默认不加也可以

server 120.24.166.46   # 阿里云NTP Server
server 127.127.1.0     # 如果公网NTP不可用时,将使用Local时间作为NTP服务提供给NTP Client。

客户端同步:(以下服务器地址免费提供使用)

ntpdate 128.1.134.178

ntpdate www.laihp.top

splunk清理数据重启服务


[root@ip-172-31-21-87 bin]# cd /data/splunk/bin/
[root@ip-172-31-21-87 bin]# ./splunk stop
Stopping splunkd...
Shutting down.  Please wait, as this may take a few minutes.
.......................................................................................................................                               [  OK  ]
Stopping splunk helpers...
                                                           [  OK  ]
Done.
[root@ip-172-31-21-87 bin]#  ./splunk clean eventdata
This action will permanently erase all events from ALL indexes; it cannot be undone.
Are you sure you want to continue [y/n]? y
Cleaning database _audit.
Cleaning database _internal.
Cleaning database _introspection.
Cleaning database _telemetry.
Cleaning database _thefishbucket.
Cleaning database aceevent.
Cleaning database b1_a_main.
Cleaning database b1_a_spin.
Cleaning database b1_amz_main.
Cleaning database c1_amz_main.
Cleaning database h1_i_main.
Cleaning database h1_i_spin.
Cleaning database history.
Cleaning database main.
Cleaning database mint.
Cleaning database requests.
Cleaning database summary.
Disabled database 'a1_a_main': will not clean.
Disabled database 'a1_a_spin': will not clean.
Disabled database 'a1_amz_main': will not clean.
Disabled database 'a1_amz_spin': will not clean.
Disabled database 'a1_i_main': will not clean.
Disabled database 'a1_i_spin': will not clean.
Disabled database 'b1_amz_spin': will not clean.
Disabled database 'c1_a_main': will not clean.
Disabled database 'c1_a_spin': will not clean.
Disabled database 'c1_amz_spin': will not clean.
Disabled database 'h1_a_main': will not clean.
Disabled database 'h1_a_spin': will not clean.
Disabled database 'splunklogger': will not clean.
[root@ip-172-31-21-87 bin]#  ./splunk start

Splunk> Australian for grep.

Checking prerequisites...
	Checking http port [80]: open
	Checking mgmt port [8089]: open
	Checking appserver port [127.0.0.1:8065]: open
	Checking kvstore port [8191]: open
	Checking configuration...  Done.
	Checking critical directories...	Done
	Checking indexes...
		Validated: _audit _internal _introspection _telemetry _thefishbucket aceevent b1_a_main b1_a_spin b1_amz_main c1_amz_main h1_i_main h1_i_spin history main mint requests summary
	Done
	Checking filesystem compatibility...  Done
	Checking conf files for problems...
	Done
	Checking default conf files for edits...
	Validating installed files against hashes from '/data/splunk/splunk-7.0.1-2b5b15c4ee89-linux-2.6-x86_64-manifest'
	All installed files intact.
	Done
All preliminary checks passed.

Starting splunk server daemon (splunkd)...  
Done
                                                           [  OK  ]

Waiting for web server at http://127.0.0.1:80 to be available.... Done


If you get stuck, we're here to help.  
Look for answers here: http://docs.splunk.com

The Splunk web interface is at http://ip-172-31-21-87


netstat命令使用

netstat -antp | grep 8088
可以查看连接8088这个端口的客户端连接数。

netstat -an | grep 8088 | wc -l

统计数量